
WebSockets are Introduced in Spring Framework 4.0
First We will understand that what is WebSocket and why we need WebSocket ?
The What Part : –WebSockets is a bi-directional, full-duplex, persistent connection between a web browser and a server.
The protocol consists of an opening handshake followed by basic message framing, layered over TCP.
- RFC 6455 - The WebSocket Protocol
The Why Part:-
The idea of WebSockets was borne out of the limitations of HTTP-based technology.
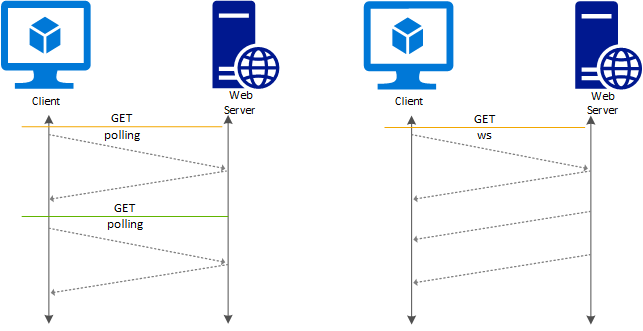
With HTTP, a client requests a resource, and the server responds with the requested data.
HTTP is a strictly unidirectional protocol — any data sent from the server to the client must be first requested by the client.
Long-polling has traditionally acted as a workaround for this limitation.
With long-polling, a client makes an HTTP request with a long timeout period,
and the server uses that long timeout to push data to the client.
Long-polling works, but comes with a drawback — resources on the server are tied up throughout the length of the long-poll,
even when no data is available to send.
WebSockets, on the other hand, allow for sending message-based data, similar to UDP, but with the reliability of TCP. WebSocket uses HTTP as the initial transport mechanism, but keeps the TCP connection alive after the HTTP response is received so that it can be used for sending messages between client and server. WebSockets allow us to build “real-time” applications without the use of long-polling.
Connection stays open till client decides to close it.
Now We will create maven project and you can use spring initializr for the same.
                <dependency>
			<groupId>org.springframework</groupId>
			<artifactId>spring-websocket</artifactId>
		</dependency>

		<dependency>
			<groupId>org.springframework</groupId>
			<artifactId>spring-messaging</artifactId>
		</dependency>
Additionally if you want to send data in JSON format then you need to add following dependencies.
                <dependency>
			<groupId>com.fasterxml.jackson.core</groupId>
			<artifactId>jackson-core</artifactId>
		</dependency>

		<dependency>
			<groupId>com.fasterxml.jackson.core</groupId>
			<artifactId>jackson-databind</artifactId>
		</dependency>
Now we need to add the websocket capabilities to our application, for that we will annotate class with @EnableWebSocketMessageBroker.
Sample Code for Configuring the WebSocket in the application
@Configuration
	@EnableWebSocketMessageBroker
	public class ApplicationWebSocketConfig extends AbstractWebSocketMessageBrokerConfigurer      {

		@Override
		public void configureMessageBroker(MessageBrokerRegistry config) {
			config.enableSimpleBroker("/topic");
			config.setApplicationDestinationPrefixes("/app");
		}

		@Override
		public void registerStompEndpoints(StompEndpointRegistry registry) {
			 registry.addEndpoint("/sendMessage");
			 registry.addEndpoint("/sendMessage").withSockJS();
		}
}- Method
configureMessageBrokeris used to configure the message broker. - We enable an in-memory message broker to carry the messages back to the client on destinations prefixed with “/topic”.
- We complete our simple configuration by designating the “/app” prefix to filter destinations targeting application annotated methods (via
@MessageMapping) - The
registerStompEndpointsmethod registers the “/sendMessage” endpoint, enabling Spring’s STOMP (Simple or Streaming Text Oriented Messaging Protocol) support. - We are also adding here an endpoint that works without the SockJS for more flexibility.
We have configured Websocket, now its time to write a controller which will handle our messages.
@MessageMapping("/sendMessage")
	@SendTo("/topic/messages")
	public OutputMessage send(String message) throws Exception {
		String time = new SimpleDateFormat("HH:mm").format(new Date());
		return new OutputMessage(message, time);
	}
For the purposes of our example, we’ll create another model object named OutputMessage to represent the output message sent to the configured destination. We populate our object with the sender and the message text taken from the incoming message and enrich it with a timestamp.
After handling our message, we send it to the appropriate destination defined with the @SendTo annotation. All subscribers to the “/topic/messages” destination will receive the message.
Now to test our application we need to create the client which will be a browser in our case.
we need to use the sockjs-client library to build a simple HTML page that interacts with our messaging system.
HTML Code :
<script src="/sockjs.min.js"></script>
	<script src="/stomp.min.js"></script>
	<script src="/app.js"></script>
For our internal purposes we have written the app.js file
app.js Code :
function setConnected(connected) {
			$("#connect").prop("disabled", connected);
			$("#disconnect").prop("disabled", !connected);
			if (connected) {
				$("#conversation").show();
			}
			else {
				$("#conversation").hide();
			}
			$("#messages").html("");
		}

		function connect() {
			var socket = new SockJS('/gs-guide-websocket');
			stompClient = Stomp.over(socket);
			stompClient.connect({}, function (frame) {
				setConnected(true);
				console.log('Connected: ' + frame);
				stompClient.subscribe('/topic/messages', function (greeting) {
					showMessages(JSON.parse(greeting.body).content);
				});
			});
			$("#confirmationModal .close").click();
		}

		function disconnect() {
			if (stompClient !== null) {
				stompClient.disconnect();
			}
			setConnected(false);
			console.log("Disconnected");
		}

		function sendName() {
			stompClient.send("/app/sendMessage", {},                         JSON.stringify({$("#name").val()}));
		}

		function showMessages(message) {
			$("#messages").append("<tr><td>" + message + "</td></tr>");
		}

		$(function () {
			$("form").on('submit', function (e) {
				e.preventDefault();
			});
			$( "#connect" ).click(function() { connect(); });
			$( "#disconnect" ).click(function() { disconnect(); });
			$( "#send" ).click(function() { sendName(); });

		});
From HTML you can use connect, disconnect and send for conneting to server, disconnecting from server and sending broadcast message to server respectively.
Practical Life uses of WebSocket and STOMP
Creating Chat Application
Broadcasting messages to all clients
Posting real-time data to client’s like Weather, news and other important updates.
Posting Server Logs to client on Browser
You Can find detailed code on github
My next blog will be Real-time Server Log Monitoring in Browser
Stay Tuned !
Happy Learning !
